> ## Documentation Index
> Fetch the complete documentation index at: https://docs.aseeflow.org/llms.txt
> Use this file to discover all available pages before exploring further.
# Create a DMN Decision Table
In this section you'll learn how to create your first DMN decision table with the Camunda Modeler. The table contains decision logic about the desired dish for a given season and guest count.
Start up the Camunda Modeler to begin.
## Create a new decision diagram
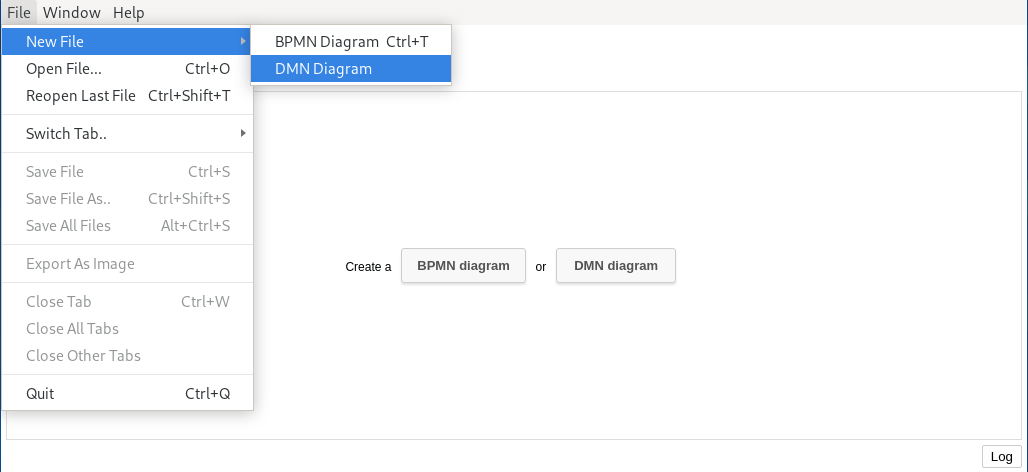
Create a new DMN diagram by clicking **File > New File > DMN Diagram**.
 ## Start with the table header
Select the decision and open the properties panel on the right side. Change the text to `dish` as the technical ID of the decision, which is used to reference the decision inside the process application.
## Start with the table header
Select the decision and open the properties panel on the right side. Change the text to `dish` as the technical ID of the decision, which is used to reference the decision inside the process application.
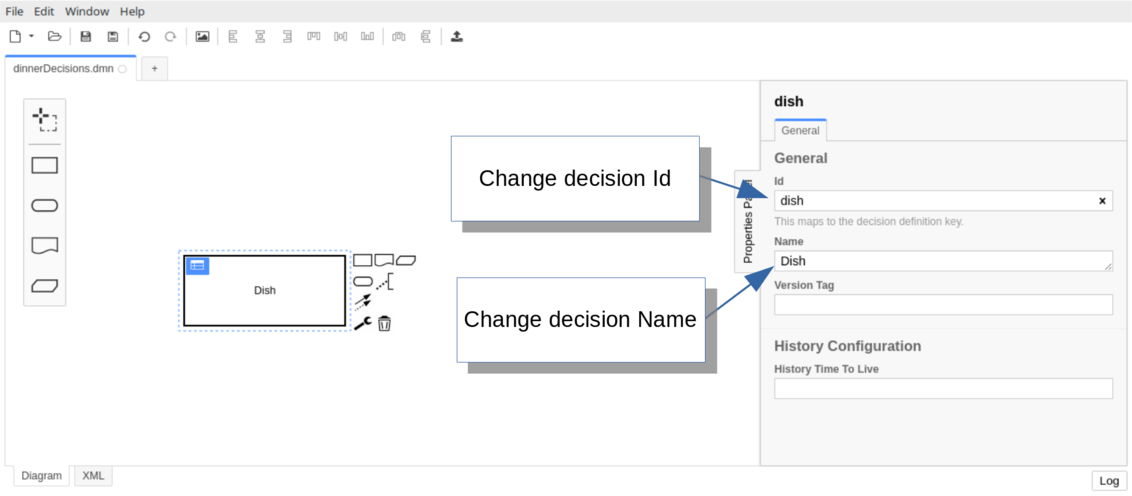 Next, set the name of the decision to *Dish* in the field below.
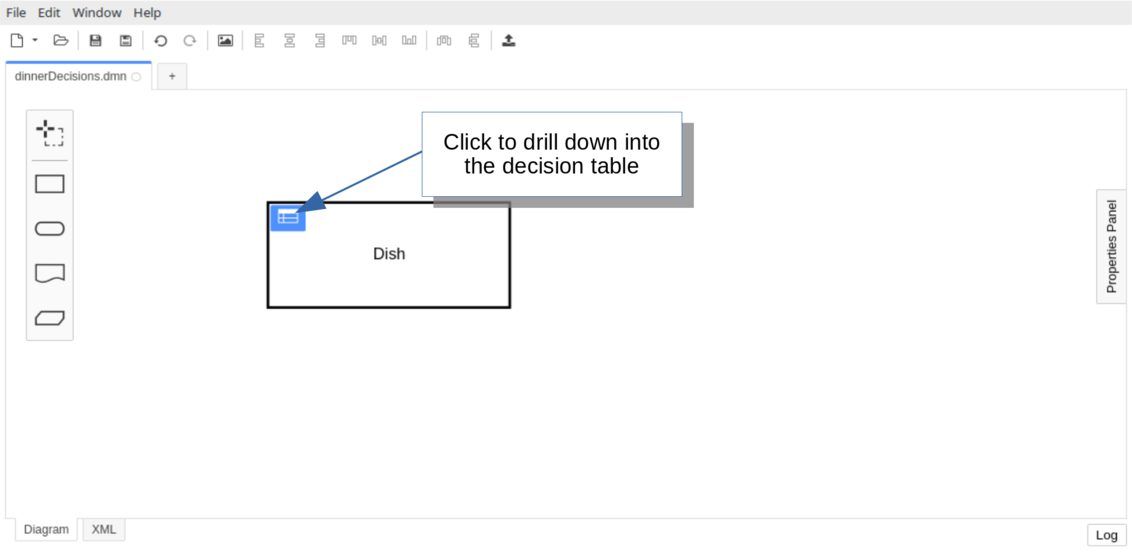
Click the table icon on top of the decision to drill down into the decision table.
Next, set the name of the decision to *Dish* in the field below.
Click the table icon on top of the decision to drill down into the decision table.
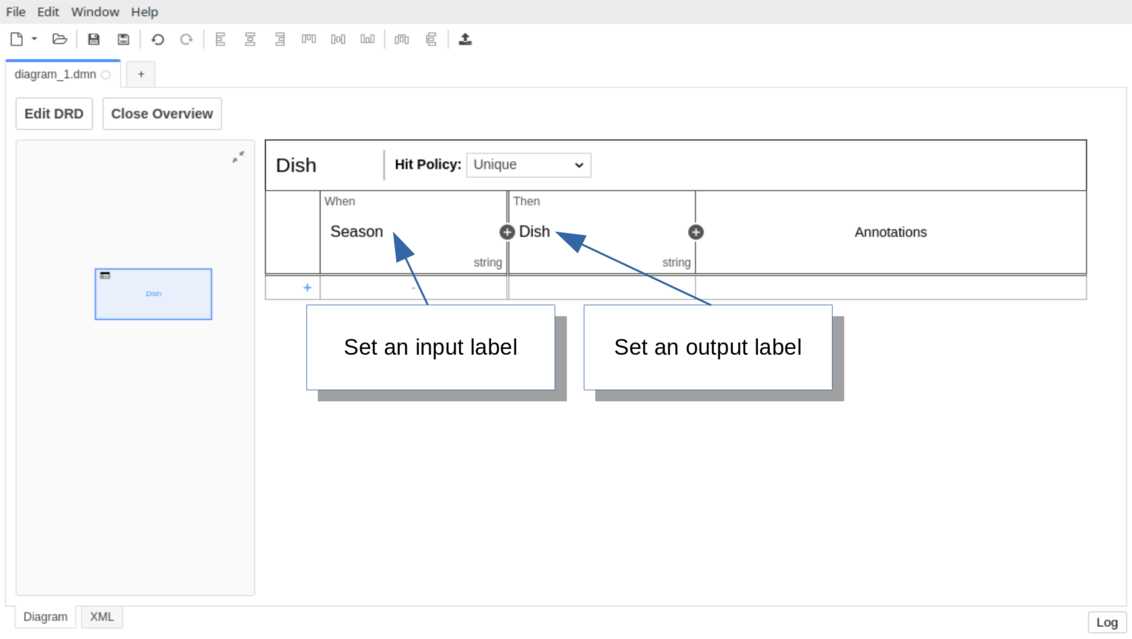
 Set the input label to *Season* by double-clicking the field under *When*. Similarly, set the output label to *Dish* by double-clicking the field under *Then*.
 ## Configure the input expression and the output name
Assuming the input value for *Season* comes from a variable named `season`, set the input expression to `season`.
Double-click the *Season* field and enter `season` as the expression in the modal menu.
## Configure the input expression and the output name
Assuming the input value for *Season* comes from a variable named `season`, set the input expression to `season`.
Double-click the *Season* field and enter `season` as the expression in the modal menu.
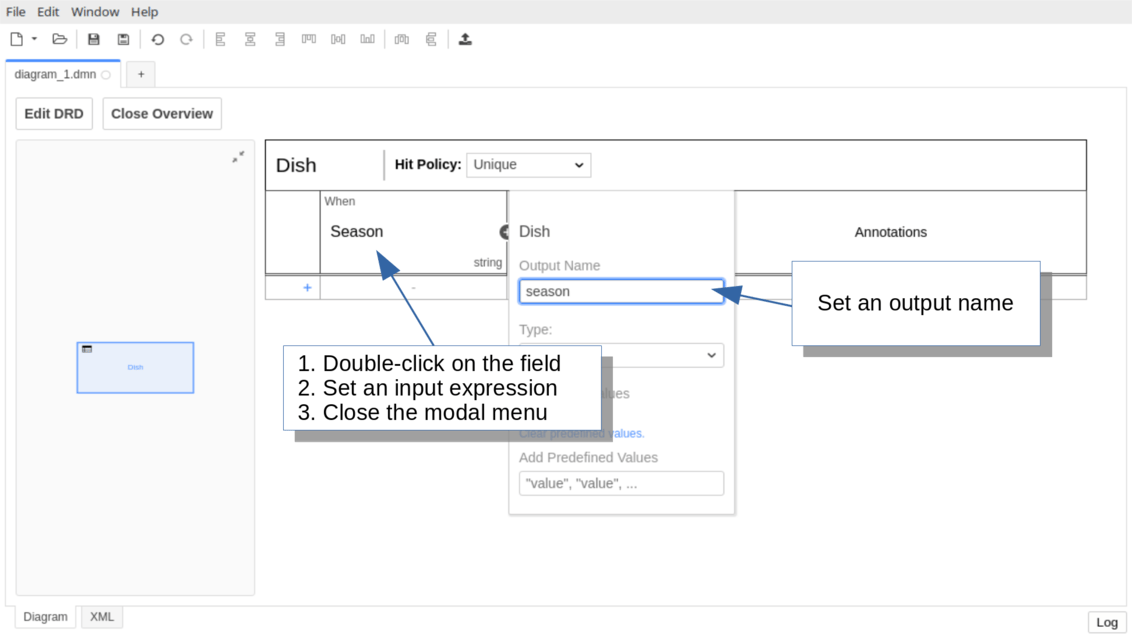 Next, double-click the *Dish* field and set `desiredDish` as the output name.
## Configure the type of the input and output
If the input value for *Season* is provided as a string, set the input type to `string`.
Double-click the *Season* column header. Open the *Type* dropdown and select `string`.
Next, double-click the *Dish* field and set `desiredDish` as the output name.
## Configure the type of the input and output
If the input value for *Season* is provided as a string, set the input type to `string`.
Double-click the *Season* column header. Open the *Type* dropdown and select `string`.
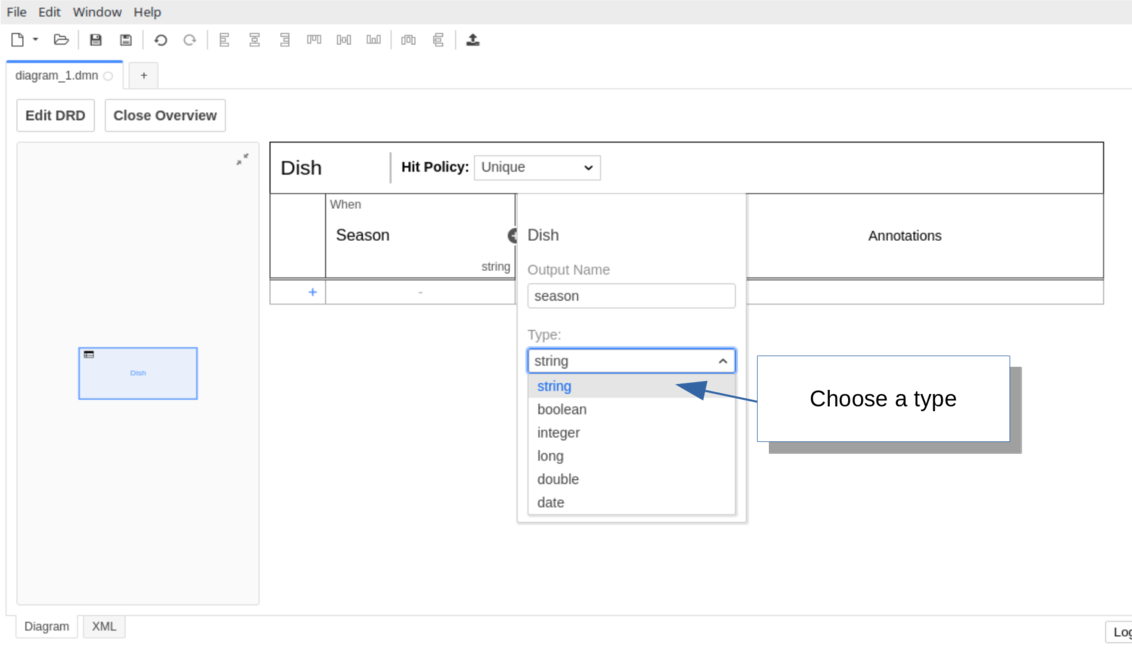 Similarly, double-click the *Dish* column header and choose `string` as the output type.
## Add rules
Add the first rule by clicking the *+* button at the bottom of the table. In the new row, type `Fall` in the input column and `Spareribs` in the output column.
Similarly, double-click the *Dish* column header and choose `string` as the output type.
## Add rules
Add the first rule by clicking the *+* button at the bottom of the table. In the new row, type `Fall` in the input column and `Spareribs` in the output column.
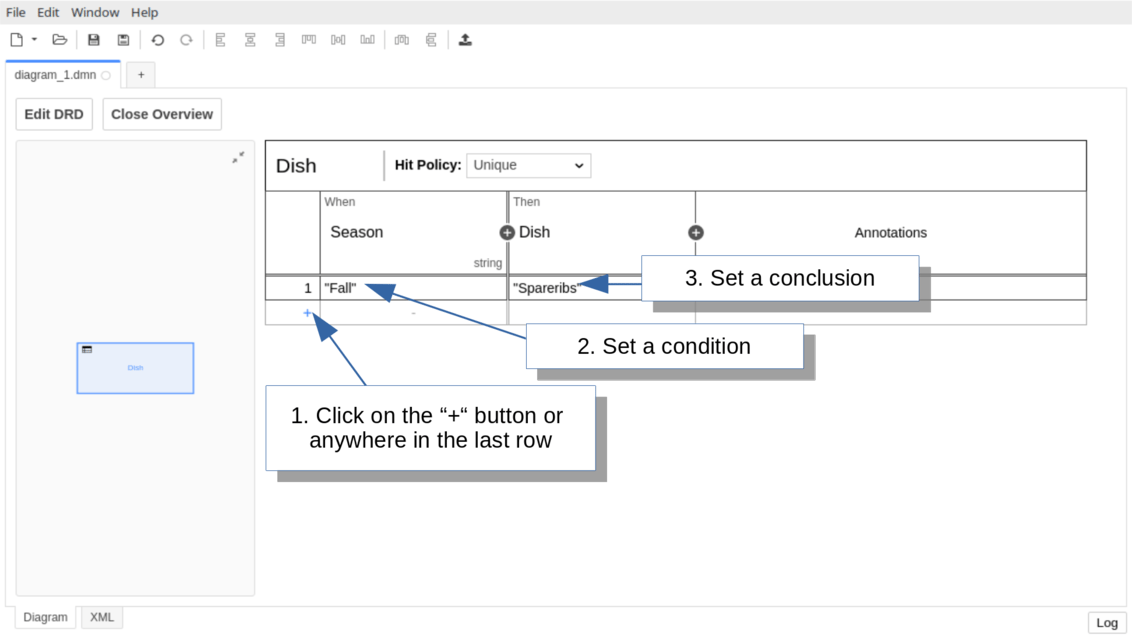 `Fall` is the condition (input entry) of the rule, expressed in FEEL. It checks whether the input value (the `season` variable) equals `Fall`.
`Spareribs` is the conclusion (output entry) of the rule and returns the string `Spareribs`.
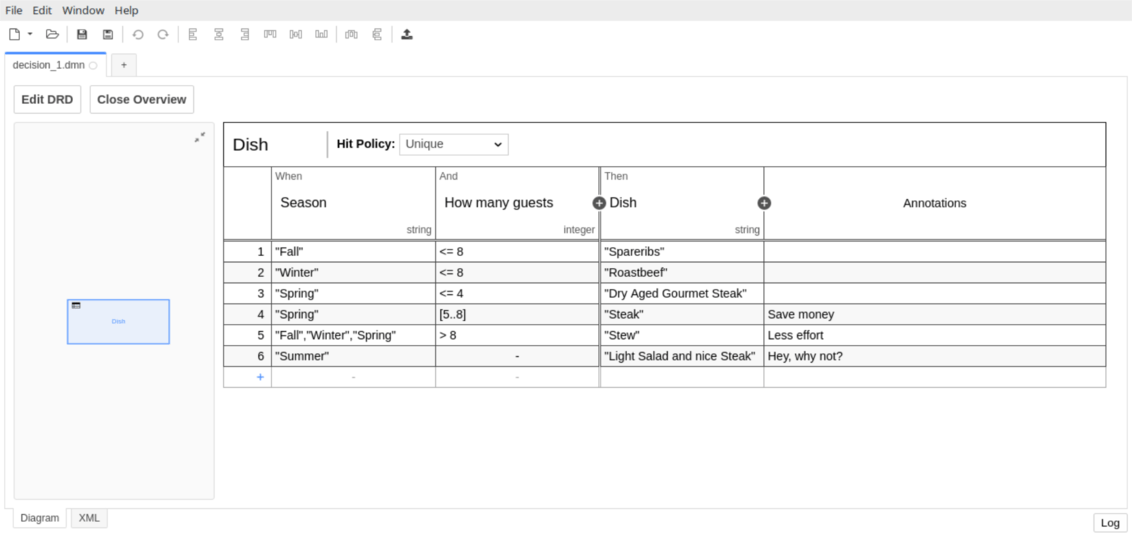
Next, add a second input *How many guests* with the input expression `guestCount` and type `integer`. Fill the table with additional rules for the remaining seasons.
`Fall` is the condition (input entry) of the rule, expressed in FEEL. It checks whether the input value (the `season` variable) equals `Fall`.
`Spareribs` is the conclusion (output entry) of the rule and returns the string `Spareribs`.
Next, add a second input *How many guests* with the input expression `guestCount` and type `integer`. Fill the table with additional rules for the remaining seasons.
 ## Configure the hit policy
Set the hit policy to *UNIQUE*, which specifies that only one rule can match. Click the *Hit Policy* dropdown and choose *UNIQUE*.
## Configure the hit policy
Set the hit policy to *UNIQUE*, which specifies that only one rule can match. Click the *Hit Policy* dropdown and choose *UNIQUE*.
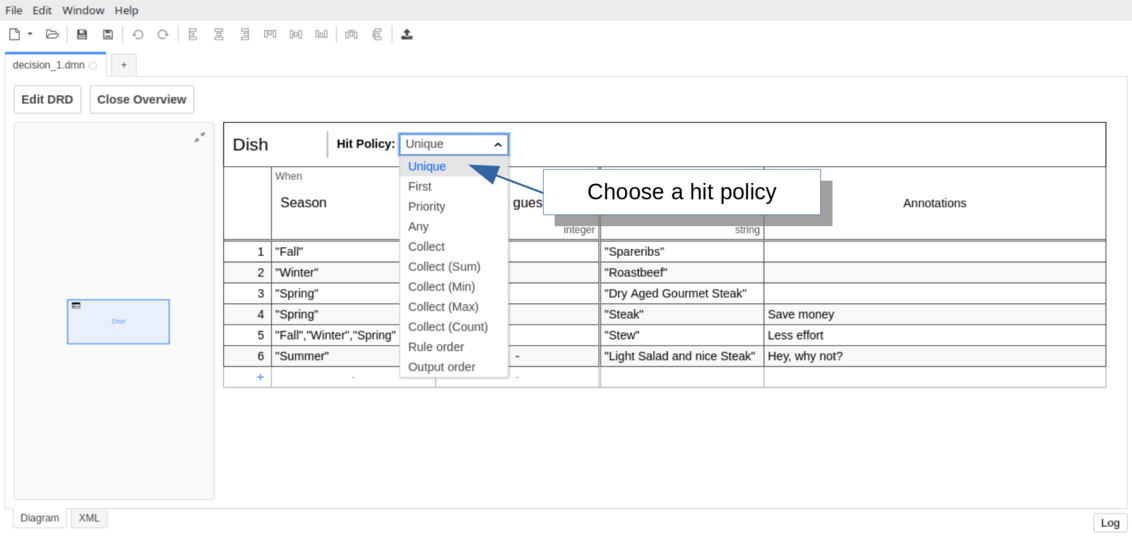 The default hit policy is *UNIQUE*. If your rules are mutually exclusive, you don't need to change this setting.
## Save the decision table
Save your changes by clicking **File > Save File As...**. Navigate to your application project directory and place the model in the `src/main/resources` folder.
The default hit policy is *UNIQUE*. If your rules are mutually exclusive, you don't need to change this setting.
## Save the decision table
Save your changes by clicking **File > Save File As...**. Navigate to your application project directory and place the model in the `src/main/resources` folder.
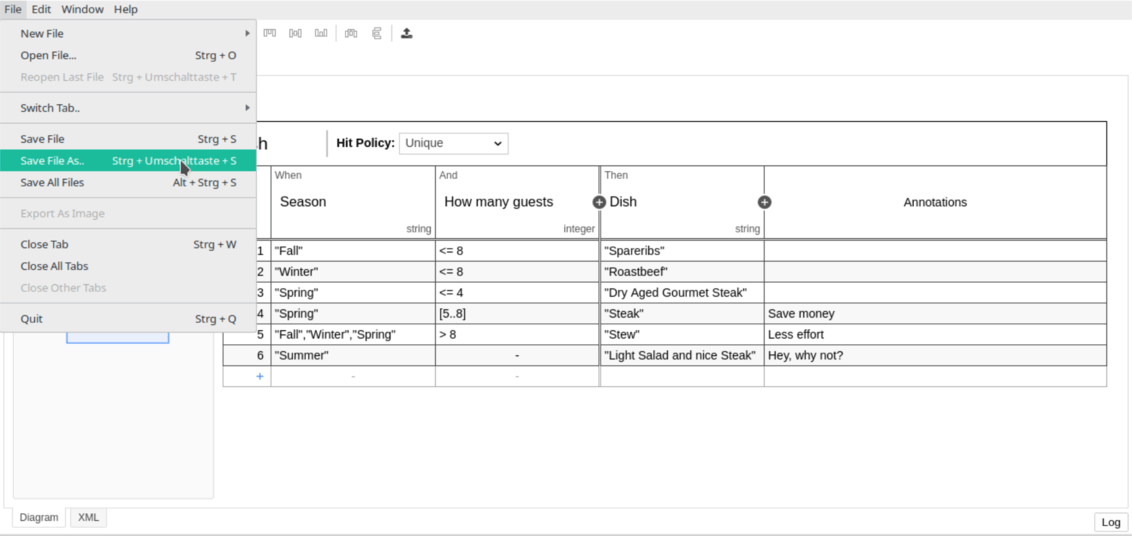 Return to your IDE, right-click the project folder, and click *Refresh* to synchronize the new DMN file. For automatic workspace synchronization, consider configuring auto-sync in your IDE.
**Catch up: get the sources of Step-3**
```bash theme={null}
git clone https://github.com/aseeflow/aseeflow-get-started-dmn.git
git checkout -f Step-3
```
Or [download as a `.zip`](https://github.com/aseeflow/aseeflow-get-started-dmn/archive/Step-3.zip).
## Next step
Continue to [evaluate and deploy the decision table](/get-started/dmn/deploy).
Return to your IDE, right-click the project folder, and click *Refresh* to synchronize the new DMN file. For automatic workspace synchronization, consider configuring auto-sync in your IDE.
**Catch up: get the sources of Step-3**
```bash theme={null}
git clone https://github.com/aseeflow/aseeflow-get-started-dmn.git
git checkout -f Step-3
```
Or [download as a `.zip`](https://github.com/aseeflow/aseeflow-get-started-dmn/archive/Step-3.zip).
## Next step
Continue to [evaluate and deploy the decision table](/get-started/dmn/deploy).