> ## Documentation Index
> Fetch the complete documentation index at: https://docs.aseeflow.org/llms.txt
> Use this file to discover all available pages before exploring further.
# Model a BPMN 2.0 Process
## Deploy and invoke a BPMN process
This guide demonstrates how to deploy a BPMN 2.0 process model and interact with it from Spring beans. The tutorial covers:
1. Modeling an executable BPMN 2.0 process
2. Using the Spring Boot Starter auto-deployment
3. Creating a process application
4. Starting a process instance
## Model an executable BPMN 2.0 process and deploy it
Begin by modeling an executable process using the Camunda Modeler. The process should resemble the loan approval diagram shown below.
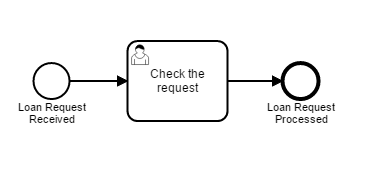 If you are unfamiliar with modeling an executable process, read the [Model a Process](/get-started/quick-start/service-task) section of the Quick Start tutorial.
After modeling, save the process file in `src/main/resources` and refresh your project in your IDE.
The process automatically deploys on engine startup when saved to the application classpath.
## Create a process application
To declare the process application, add the `@EnableProcessApplication` annotation to your application class and place an empty `processes.xml` file in `src/main/resources/META-INF`.
## Start a process instance after the process application has been deployed
Listen for the `PostDeployEvent` to start the process instance automatically:
```java theme={null}
@Autowired
private RuntimeService runtimeService;
@EventListener
private void processPostDeploy(PostDeployEvent event) {
runtimeService.startProcessInstanceByKey("loanApproval");
}
```
The `@Autowired` annotation enables dependency injection of ASEE Flow engine services.
## Rebuild and test
If you are unfamiliar with modeling an executable process, read the [Model a Process](/get-started/quick-start/service-task) section of the Quick Start tutorial.
After modeling, save the process file in `src/main/resources` and refresh your project in your IDE.
The process automatically deploys on engine startup when saved to the application classpath.
## Create a process application
To declare the process application, add the `@EnableProcessApplication` annotation to your application class and place an empty `processes.xml` file in `src/main/resources/META-INF`.
## Start a process instance after the process application has been deployed
Listen for the `PostDeployEvent` to start the process instance automatically:
```java theme={null}
@Autowired
private RuntimeService runtimeService;
@EventListener
private void processPostDeploy(PostDeployEvent event) {
runtimeService.startProcessInstanceByKey("loanApproval");
}
```
The `@Autowired` annotation enables dependency injection of ASEE Flow engine services.
## Rebuild and test
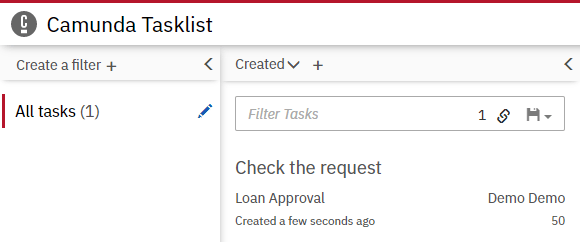 After rebuilding and restarting, you should see *Check the request* in Tasklist under *All tasks*.
**Catch up: get the sources of Step-3**
```bash theme={null}
git clone https://github.com/aseeflow/aseeflow-get-started-spring-boot.git
git checkout -f Step-3
```
Or [download as a `.zip`](https://github.com/aseeflow/aseeflow-get-started-spring-boot/archive/Step-3.zip).
After rebuilding and restarting, you should see *Check the request* in Tasklist under *All tasks*.
**Catch up: get the sources of Step-3**
```bash theme={null}
git clone https://github.com/aseeflow/aseeflow-get-started-spring-boot.git
git checkout -f Step-3
```
Or [download as a `.zip`](https://github.com/aseeflow/aseeflow-get-started-spring-boot/archive/Step-3.zip).