> ## Documentation Index
> Fetch the complete documentation index at: https://docs.aseeflow.org/llms.txt
> Use this file to discover all available pages before exploring further.
# JSF Task Forms
## Adding JSF Forms to your Process Application
**Heads-up!**
The required CDI beans for this functionality are currently not available in [Quarkus applications](/user-guide/quarkus-integration/cdi-integration#task-form-beans) out of the box.
If you add JSF forms as described below, you can easily use them as
[external task forms](/user-guide/task-forms#external-task-forms).
A working example can be found in the [examples repository](https://github.com/camunda/camunda-bpm-examples/tree/master/usertask/task-form-external-jsf).
The BPMN process used for this example is shown in the image below:
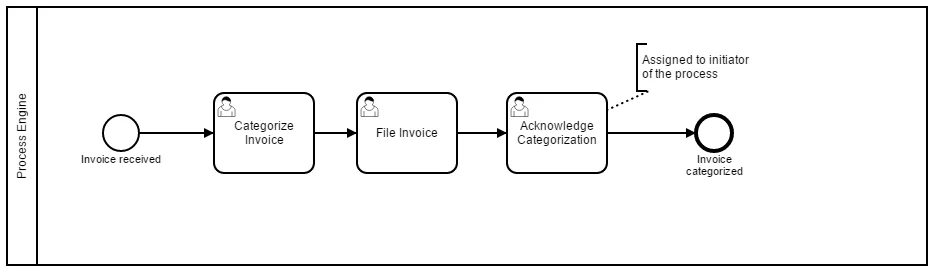 In this process model we added so called form keys to
* the Start Event "invoice received". This is the form the user has to complete to start a new process instance.
* the User Tasks. These are the forms the user has to complete when completing user tasks that are assigned to him.
This is how the forms are referenced in the BPMN 2.0 XML with the `camunda:formKey` attribute:
```xml theme={null}
```
## Creating Simple User Task Forms
Create a JSF page in `src/main/webapp/WEB-INF` representing a form used for User Tasks. A very simple task form is shown below:
```xml theme={null}
Task Form: #{task.name}
In this process model we added so called form keys to
* the Start Event "invoice received". This is the form the user has to complete to start a new process instance.
* the User Tasks. These are the forms the user has to complete when completing user tasks that are assigned to him.
This is how the forms are referenced in the BPMN 2.0 XML with the `camunda:formKey` attribute:
```xml theme={null}
```
## Creating Simple User Task Forms
Create a JSF page in `src/main/webapp/WEB-INF` representing a form used for User Tasks. A very simple task form is shown below:
```xml theme={null}
Task Form: #{task.name}
#{task.name}
Here you would see the actual form to work on the task in a design
normally either matching your task list or your business application
(or both in the best case).
```
Note that you need `camunda-engine-cdi` in order to have the `camundaTaskForm` bean available.
## How does this work?
If the user clicks on "Start to work on task"  in the tasklist, he will follow a link to this form, including the taskId and the callback URL (the URL to access the central tasklist) as GET-Parameters. Accessing this form will trigger the special CDI bean `camundaTaskForm` which
* starts a conversation,
* remembers the callback URL
* starts the User Task in the process engine, meaning the bean sets the start date and assigns the task to the CDI business process scope (see [CDI Integration](/user-guide/cdi-java-ee-integration) for details).
For that, you just need to add this code block to the beginning of your JSF view:
```xml theme={null}
```
Submit the form by calling the `camundaTaskForm` bean again, which:
* Completes the task in the process engine, causing the current token to advance in the process
* Ends the conversation
* Triggers a redirect to the callback URL of the tasklist
```xml theme={null}
```
Note that the command button doesn't have to be on the same form, you might have a whole wizard containing multiple forms in a row before having the `completeTask` button. This will work because of the conversation running in the background.
## Access Process Variables
In the forms you can access your own CDI beans as usual and also access the ASEE Flow CDI beans. This makes it easy to access process variables, e.g., via the `processVariables` CDI bean:
```xml theme={null}
in the tasklist, he will follow a link to this form, including the taskId and the callback URL (the URL to access the central tasklist) as GET-Parameters. Accessing this form will trigger the special CDI bean `camundaTaskForm` which
* starts a conversation,
* remembers the callback URL
* starts the User Task in the process engine, meaning the bean sets the start date and assigns the task to the CDI business process scope (see [CDI Integration](/user-guide/cdi-java-ee-integration) for details).
For that, you just need to add this code block to the beginning of your JSF view:
```xml theme={null}
```
Submit the form by calling the `camundaTaskForm` bean again, which:
* Completes the task in the process engine, causing the current token to advance in the process
* Ends the conversation
* Triggers a redirect to the callback URL of the tasklist
```xml theme={null}
```
Note that the command button doesn't have to be on the same form, you might have a whole wizard containing multiple forms in a row before having the `completeTask` button. This will work because of the conversation running in the background.
## Access Process Variables
In the forms you can access your own CDI beans as usual and also access the ASEE Flow CDI beans. This makes it easy to access process variables, e.g., via the `processVariables` CDI bean:
```xml theme={null}
Here you would see the actual form to work on the task in some design normally either matching you task list or your business application (or both in the best case).
|
Process variable x (given in in the start form):
|
|
|
Process variable y (added in this task form):
|
|
|
|
```
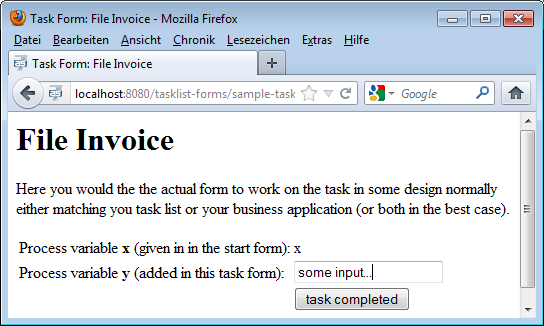
This is rendered to a simple form:
 The same mechanism can be used to start a new process instance:
```xml theme={null}
Start Process: #{camundaTaskForm.processDefinition.name}
The same mechanism can be used to start a new process instance:
```xml theme={null}
Start Process: #{camundaTaskForm.processDefinition.name}
#{camundaTaskForm.processDefinition.name}
Start a new process instance in version: #{camundaTaskForm.processDefinition.version}
Here you see the actual form to start a new process instance, normally
this would be in some design either matching you task list or your business
application (or both in the best case).
```
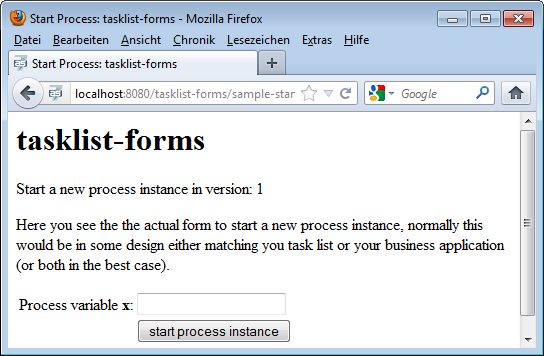 If the user clicks on "Start a process instance"
  in the tasklist and chooses the process your start form is assigned to, he will follow a link to this form, including the processDefinitionKey and the callback URL (the URL to access the central tasklist) as GET-Parameters. Accessing this form will trigger the special CDI bean `camundaTaskForm` which:
* Starts a conversation
* Remembers the callback URL to the centralized tasklist
You need to add this code block to the beginning of your JSF view:
```xml theme={null}
```
Submitting the start form now:
* Starts the process instance in the process engine
* Ends the conversation
* Triggers a redirect to the callback URL of the tasklist
```xml theme={null}
```
Note that the command button doesn't have to be on the same form, you might have a whole wizard containing multiple forms in a row before having the `completeProcessInstanceForm` button. This will work because of the conversation running in the background.
## Styling your Task Forms
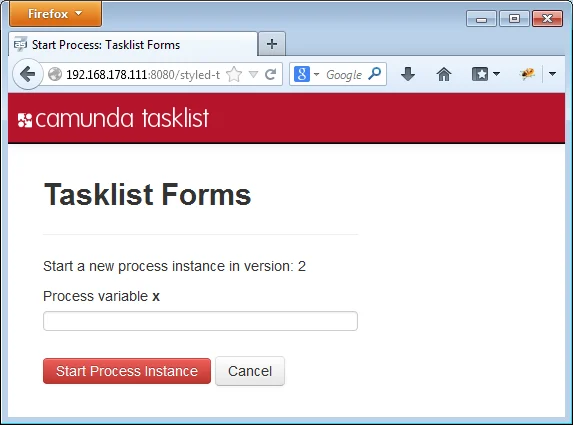
We use [Twitter Bootstrap](http://getbootstrap.com/) in our tasklist - so best add this to your Process Application as well and you can easily polish your UI:
in the tasklist and chooses the process your start form is assigned to, he will follow a link to this form, including the processDefinitionKey and the callback URL (the URL to access the central tasklist) as GET-Parameters. Accessing this form will trigger the special CDI bean `camundaTaskForm` which:
* Starts a conversation
* Remembers the callback URL to the centralized tasklist
You need to add this code block to the beginning of your JSF view:
```xml theme={null}
```
Submitting the start form now:
* Starts the process instance in the process engine
* Ends the conversation
* Triggers a redirect to the callback URL of the tasklist
```xml theme={null}
```
Note that the command button doesn't have to be on the same form, you might have a whole wizard containing multiple forms in a row before having the `completeProcessInstanceForm` button. This will work because of the conversation running in the background.
## Styling your Task Forms
We use [Twitter Bootstrap](http://getbootstrap.com/) in our tasklist - so best add this to your Process Application as well and you can easily polish your UI:
 To include CSS and Javascript libraries in your project you can add them to your maven project as dependencies.
```xml theme={null}
org.webjars
bootstrap
3.1.1
```
To use them, add tags like the following ones to your JSF page. If you have several forms, it may be helpful to create a template that you can refer to from your forms to avoid redundancies..
```xml theme={null}
your title
```
To include CSS and Javascript libraries in your project you can add them to your maven project as dependencies.
```xml theme={null}
org.webjars
bootstrap
3.1.1
```
To use them, add tags like the following ones to your JSF page. If you have several forms, it may be helpful to create a template that you can refer to from your forms to avoid redundancies..
```xml theme={null}
your title
```