> ## Documentation Index
> Fetch the complete documentation index at: https://docs.aseeflow.org/llms.txt
> Use this file to discover all available pages before exploring further.
# Testing
Testing BPMN processes, CMMN cases (and also DMN decisions) is just as important as testing code.
This section explains how to write unit tests and integration tests with ASEE Flow and explains some best practice and guidelines.
## Unit Tests
ASEE Flow provides helper classes to write unit tests for JUnit versions 3, 4 and 5.
### JUnit 5
ASEE Flow version ships with a [JUnit 5 extension](https://docs.camunda.org/javadoc/camunda-bpm-platform/7.24/org/camunda/bpm/engine/test/junit5/ProcessEngineExtension.html) that provides access to the process engine and services through getter methods.
The extensions process engine is configured by the default configuration file called `camunda.cfg.xml`, which needs to be placed on the classpath. A custom configuration file can be passed to the extension when creating the `ProcessEngineExtension` object.
If you want to use the JUnit 5 `ProcessEngineExtension`, you need to add the following dependency to your `pom.xml` file:
```xml theme={null}
org.aseeflow.bpm
aseeflow-bpm-junit5
1.0.0
test
```
The following code snippets show examples of how to use the extension.
Use the `@ExtendWith` annotation to inject a process engine into a provided field automatically.
```java theme={null}
@ExtendWith(ProcessEngineExtension.class)
public class MyBusinessProcessTest {
// provide a field where the process engine gets injected
ProcessEngine processEngine;
@Test
@Deployment
public void extensionUsageExample() {
RuntimeService runtimeService = processEngine.getRuntimeService();
runtimeService.startProcessInstanceByKey("extensionUsage");
TaskService taskService = processEngine.getTaskService();
Task task = taskService.createTaskQuery().singleResult();
assertThat(task.getName()).isEqualTo("My Task");
taskService.complete(task.getId());
assertThat(runtimeService.createProcessInstanceQuery().count()).isEqualTo(0);
}
}
```
Use the `@RegisterExtension` to create a referenceable ProcessEngineExtension object which gives you access to more configuration options.
```java theme={null}
public class MyBusinessProcessTest {
@RegisterExtension
ProcessEngineExtension extension = ProcessEngineExtension.builder()
.configurationResource("myConfig.xml")
.build();
@Test
@Deployment
public void extensionUsageExample() {
RuntimeService runtimeService = extension.getRuntimeService();
runtimeService.startProcessInstanceByKey("extensionUsage");
TaskService taskService = extension.getTaskService();
Task task = taskService.createTaskQuery().singleResult();
assertThat(task.getName()).isEqualTo("My Task");
taskService.complete(task.getId());
assertThat(runtimeService.createProcessInstanceQuery().count()).isEqualTo(0);
}
}
```
If you don't want to create a configuration file, you can configure a process engine programmatically.
```java theme={null}
public class MyBusinessProcessTest {
public ProcessEngine myProcessEngine = ProcessEngineConfiguration
.createStandaloneInMemProcessEngineConfiguration()
.setJdbcUrl("jdbc:h2:mem:camunda;DB_CLOSE_DELAY=1000")
.buildProcessEngine();
@RegisterExtension
ProcessEngineExtension extension = ProcessEngineExtension
.builder()
.useProcessEngine(myProcessEngine)
.build();
}
```
### JUnit 4
Using the JUnit 4 style of writing unit tests, the [ProcessEngineRule](https://docs.camunda.org/javadoc/camunda-bpm-platform/7.24/org/camunda/bpm/engine/test/ProcessEngineRule.html) must be used. Through this rule, the process engine and services are available through getters.
This rule will look for the default configuration file on the classpath called `camunda.cfg.xml`. When constructing the ProcessEngineRule object you can pass a custom configuration file to the rule. Process engines are statically cached over multiple unit tests when using the same configuration resource.
The following code snippet shows an example of using the JUnit 4 style of testing and the usage of the ProcessEngineRule.
```java theme={null}
public class MyBusinessProcessTest {
@Rule
public ProcessEngineRule processEngineRule = new ProcessEngineRule();
@Test
@Deployment
public void ruleUsageExample() {
RuntimeService runtimeService = processEngineRule.getRuntimeService();
runtimeService.startProcessInstanceByKey("ruleUsage");
TaskService taskService = processEngineRule.getTaskService();
Task task = taskService.createTaskQuery().singleResult();
assertThat(task.getName()).isEqualTo("My Task");
taskService.complete(task.getId());
assertThat(runtimeService.createProcessInstanceQuery().count()).isEqualTo(0);
}
}
```
### JUnit 3
In the JUnit 3 style, the [ProcessEngineTestCase](https://docs.camunda.org/javadoc/camunda-bpm-platform/7.24/org/camunda/bpm/engine/test/ProcessEngineTestCase.html) must be extended. This will make the ProcessEngine and the services available through protected member fields. In the `setup()` of the test, the processEngine will be initialized by default with the `camunda.cfg.xml` resource on the classpath. To specify a different configuration file, override the getConfigurationResource() method. Process engines are cached statically over multiple unit tests when the configuration resource is the same.
A JUnit 3 style test can look as follows:
```java theme={null}
public class MyBusinessProcessTest extends ProcessEngineTestCase {
@Deployment
public void testSimpleProcess() {
runtimeService.startProcessInstanceByKey("simpleProcess");
Task task = taskService.createTaskQuery().singleResult();
assertThat(task.getName()).isEqualTo("My Task");
taskService.complete(task.getId());
assertThat(runtimeService.createProcessInstanceQuery().count()).isEqualTo(0);
}
}
```
### Deploy Test Resources
You can annotate test classes and methods with [@Deployment](https://docs.camunda.org/javadoc/camunda-bpm-platform/7.24/org/camunda/bpm/engine/test/Deployment.html). Before the test is run, a resource file named `TestClassName.bpmn20.xml` (for a class-level annotation) or `TestClassName.testMethod.bpmn20.xml` (for a method-level annotation), in the same package as the test class, will be deployed. At the end of the test the deployment will be deleted, including all related process instances, tasks, etc. The `@Deployment` annotation also supports setting the resource location explicitly.
```
@Deployment(resources = {"myProcess.bpmn", "mySubprocess.bpmn"})
```
will pick the files `myProcess.bpmn` and `mySubProcess.bpmn` directly from the top of the classpath.
Method-level annotations override class-level annotations. See the Javadocs for [@Deployment](https://docs.camunda.org/javadoc/camunda-bpm-platform/7.24/org/camunda/bpm/engine/test/Deployment.html)more details.
The annotation is supported for [JUnit 3](#junit-3) and [JUnit 4](#junit-4) style of testing.
### Specify the required History Level
If a test requires a specific history level (e.g., because it uses the HistoryService) then you can annotate the test class or method with [@RequiredHistoryLevel](https://docs.camunda.org/javadoc/camunda-bpm-platform/7.24/org/camunda/bpm/engine/test/RequiredHistoryLevel.html) and specify the required history level (e.g., "activity", "full"). Before the test is run, it checks the current history level of the process engine and skip the test if the history level is lower than the specified one.
A JUnit 4 style test can look as follows:
```java theme={null}
public class MyBusinessProcessTest {
@Rule
public ProcessEngineRule processEngineRule = new ProcessEngineRule();
@Test
@Deployment
@RequiredHistoryLevel(ProcessEngineConfiguration.HISTORY_ACTIVITY)
public void ruleUsageExample() {
RuntimeService runtimeService = processEngineRule.getRuntimeService();
runtimeService.startProcessInstanceByKey("ruleUsage");
HistoryService historyService = processEngineRule.getHistoryService();
// requires history level >= "activity"
HistoricVariableInstance variable = historyService
.createHistoricVariableInstanceQuery()
.singleResult();
assertEquals("value", variable.getValue());
}
}
```
The annotation is supported for [JUnit 3](#junit-3) and [JUnit 4](#junit-4) style of testing. Note that a skipped test is marked as passed for JUnit 3 style tests since JUnit 3 doesn't support skipping of tests.
### Debug Unit Tests
When using the in-memory H2 database for unit tests, the following instructions allow to easily inspect the data in the engine database during a debugging session. The screenshots here are taken in Eclipse, but the mechanism should be similar for other IDEs.
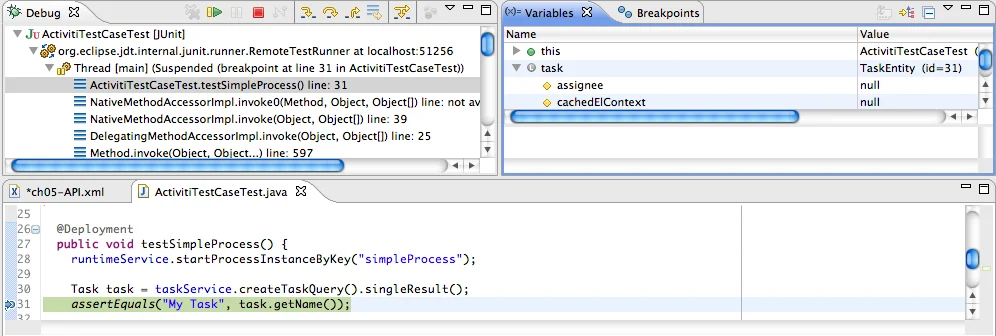
Suppose we have put a breakpoint somewhere in our unit test. In Eclipse this is done by double-clicking in the left border next to the code:
 If we now run the unit test in debug mode (right-click in test class, select 'Run as' and then 'JUnit test'), the test execution halts at our breakpoint, where we can now inspect the variables of our test as shown in the right upper panel.
 To inspect the data, open up the 'Display' window (if this window isn't there, open Window->Show View->Other and select Display.) and type (code completion is available) `org.h2.tools.Server.createWebServer("-web").start()`
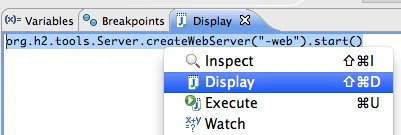 Select the line you've just typed and right-click on it. Now select 'Display' (or execute the shortcut instead of right-clicking)
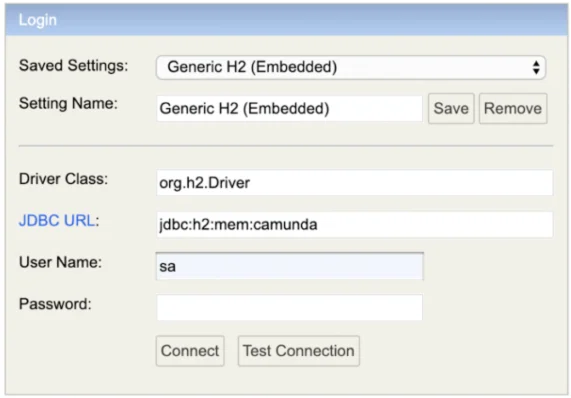
 Now open up a browser and go to [http://localhost:8082](http://localhost:8082), and fill in the JDBC URL to the in-memory database (by default this is jdbc:h2:mem:camunda), and hit the connect button.
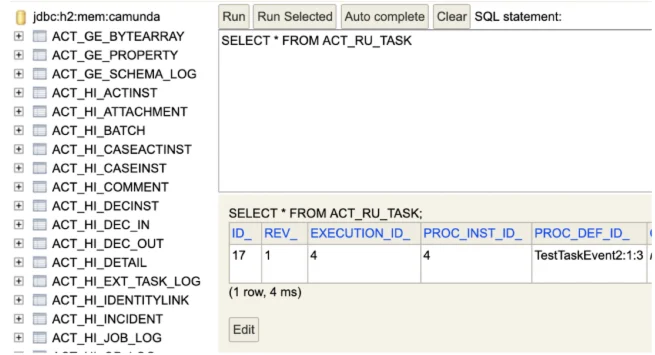
 You can now see the engine database and use it to understand how and why your unit test is executing your process in a certain way.
 ## ASEE Flow Assertions
Additional to normal JUnit assertions, [ASEE Flow Assert](https://github.com/camunda/camunda-bpm-platform/tree/7.24.0/test-utils/assert) adds a fluent API for asserting typical scenarios in a process integrating with [AssertJ](https://joel-costigliola.github.io/assertj/).
```java theme={null}
assertThat(processInstance).isWaitingAt("UserTask_InformCustomer");
assertThat(task()).hasCandidateGroup("Sales").isNotAssigned();
```
You can find a more extensive guide with examples under [Assert Examples](/user-guide/testing/assert-examples).
To use ASEE Flow Assert, add the following dependency to your `pom.xml`:
```xml theme={null}
org.aseeflow.bpm
aseeflow-bpm-assert
${version.aseeflow}
test
```
Also, you will have to add the AssertJ library to your dependencies. Make sure that the version is correct. You can find the correct version in the compatibility matrix below.
```xml theme={null}
org.assertj
assertj-core
${version.assertJ}
test
```
If ASEE Flow Assert is used in combination with [Spring Boot](https://spring.io/projects/spring-boot) or the
[ASEE Flow Spring Boot Starter](/user-guide/spring-boot-integration),
the AssertJ dependency will be present in your project already.
### Assertions Version Compatibility
Each version of ASEE Flow Assert is bound to a specific version of ASEE Flow and AssertJ. Only these default combinations are recommended (and supported) by ASEE Flow.
Nevertheless, each version of ASEE Flow Assert can be combined with newer patch versions of the ASEE Flow engine, though such combinations must be thoroughly tested before being used in production.
The project was moved into the [ASEE Flow repository](https://github.com/camunda/camunda-bpm-platform) and will use the same versioning as ASEE Flow in the future.
## Community extensions to support testing
There are a couple of well documented and heavily used community extensions that can make testing much more productive and fun.
### Camunda Scenario Tests
[camunda-bpm-assert-scenario](https://github.com/camunda/camunda-bpm-assert-scenario/) enables you to write more robust test suites.
The idea is, that you only have to adapt your tests if your process models changes in a way that affects the tested behavior. It concentrates much less on the concrete path through a given process model, but on the external effects the path through the model has.
```java theme={null}
@Test
public void testHappyPath() {
// "given" part of the test
when(process.waitsAtUserTask("CompleteWork")).thenReturn(
(task) -> task.complete()
);
// "when" part of the test
run(process).startByKey("ReadmeProcess").execute();
// "then" part of the test
verify(process).hasFinished("WorkFinished");
}
```
### Camunda Test Coverage
[camunda-bpm-process-test-coverage](https://github.com/camunda/camunda-bpm-process-test-coverage/) visualises test process pathes and checks your process model coverage ratio. Running typical JUnit tests leaves html files in the build output.
## Resolving Beans Without Spring/CDI
The `Mocks` class can be used to make beans available inside the *Expression Language* or in *Script Tasks* without the need of any bean manager.
Register the bean inside the application:
```java theme={null}
Mocks.register("myBean", new Bean());
```
Now the named bean is exposed and can be used within the process:
```xml theme={null}
```
In the case, that mocked beans must be resolvable during process deployment (e.g. bean expression in timer start event definition),
one should make sure, that they are registered before the deployment happens. E.g. when used in combination with
`@Deployment` annotation, beans should not be registered in `@Before` method, but rather the separate test rule can be created, that registers beans on startup,
and chained before `ProcessEngineRule`.
**The mocked beans feature should be used for testing purposes only.** Beans that are stored with `Mocks` are exclusively available within the respective storing thread as it is based on `ThreadLocal`. In most productive environments, it is not possible to access mocked beans during process execution due to the reason that jobs are executed by the multi-threaded Job Executor. Since the [Job Executor is disabled in unit test scenarios](/user-guide/process-engine/the-job-executor#job-executor-in-a-unit-test), the thread of process execution is the same that creates mocked bean instances.
## Best Practice
### Write Focused Tests
The feature to [start a process instance at a set of activities](/user-guide/process-engine/process-engine-concepts#start-a-process-instance-at-any-set-of-activities) can be used to to create a very specific scenario without much setup. Similarly, certain activities can be skipped by using [process instance modification](/user-guide/process-engine/process-instance-modification).
### Scoping Tests
BPMN processes, CMMN cases and DMN decisions do not exist in isolation. Consider the example of a BPMN process: firstly, the process itself is executed by the ASEE Flow engine which requires a database. Next, the process is "not just the process". It can contain expressions, scripts and often calls out to custom Java classes which may in turn again call out to services, either locally or remotely. To test the process, all these things need to be present, otherwise the test cannot work.
Setting all of this up just to run a unit test is expensive. This is why, in practice, it makes sense to apply a concept which we call test scoping. Scoping the test means limiting the amount of infrastructure required to run the test. Things outside of the scope of the test are mocked.
#### Example: Scoping Tests for a Java EE Application
This is best explained using an example. Assume you are building a typical Java EE application containing a BPMN process. The process uses Java Expression Language (EL) for conditions, it invokes Java Delegate implementations as CDI beans, these beans may in turn call out to the actual business logic implemented as EJBs. The business logic uses JPA for maintaining additional business objects in a secondary database. It also sends out messages using JMS to interact with external systems and has a nice web UI. The application runs inside a Java EE application server like Wildfly.
To test this application, all components, including the application server itself, need to be present and the external systems need to process the JMS messages. This makes it hard to write focused tests. However, by looking at the process itself, we find that there are many aspects of it that we can test without having the complete infrastructure in place. For example, if the process data is present, the Expression Language conditions can usually be tested without any additional infrastructure. This already allows asserting that the process "takes the right turn" at a gateway given a set of input data. Next, if the EJBs are mocked, the delegation logic can be included in such tests as well. This allows asserting that wiring of the delegation logic is correct, that it performs correct data transformation and mapping and that it invokes the business logic with the correct parameters. Given that the ASEE Flow engine can work with an in-memory database, it now becomes possible to test the BPMN process "in isolation", as a unit test and assert its local functional correctness. The same principle can be applied to the next "outer layers" of the system, including the business logic and external systems.
The following drawing shows a schematic representation of what this looks like for our example of a Java EE application:
## ASEE Flow Assertions
Additional to normal JUnit assertions, [ASEE Flow Assert](https://github.com/camunda/camunda-bpm-platform/tree/7.24.0/test-utils/assert) adds a fluent API for asserting typical scenarios in a process integrating with [AssertJ](https://joel-costigliola.github.io/assertj/).
```java theme={null}
assertThat(processInstance).isWaitingAt("UserTask_InformCustomer");
assertThat(task()).hasCandidateGroup("Sales").isNotAssigned();
```
You can find a more extensive guide with examples under [Assert Examples](/user-guide/testing/assert-examples).
To use ASEE Flow Assert, add the following dependency to your `pom.xml`:
```xml theme={null}
org.aseeflow.bpm
aseeflow-bpm-assert
${version.aseeflow}
test
```
Also, you will have to add the AssertJ library to your dependencies. Make sure that the version is correct. You can find the correct version in the compatibility matrix below.
```xml theme={null}
org.assertj
assertj-core
${version.assertJ}
test
```
If ASEE Flow Assert is used in combination with [Spring Boot](https://spring.io/projects/spring-boot) or the
[ASEE Flow Spring Boot Starter](/user-guide/spring-boot-integration),
the AssertJ dependency will be present in your project already.
### Assertions Version Compatibility
Each version of ASEE Flow Assert is bound to a specific version of ASEE Flow and AssertJ. Only these default combinations are recommended (and supported) by ASEE Flow.
Nevertheless, each version of ASEE Flow Assert can be combined with newer patch versions of the ASEE Flow engine, though such combinations must be thoroughly tested before being used in production.
The project was moved into the [ASEE Flow repository](https://github.com/camunda/camunda-bpm-platform) and will use the same versioning as ASEE Flow in the future.
## Community extensions to support testing
There are a couple of well documented and heavily used community extensions that can make testing much more productive and fun.
### Camunda Scenario Tests
[camunda-bpm-assert-scenario](https://github.com/camunda/camunda-bpm-assert-scenario/) enables you to write more robust test suites.
The idea is, that you only have to adapt your tests if your process models changes in a way that affects the tested behavior. It concentrates much less on the concrete path through a given process model, but on the external effects the path through the model has.
```java theme={null}
@Test
public void testHappyPath() {
// "given" part of the test
when(process.waitsAtUserTask("CompleteWork")).thenReturn(
(task) -> task.complete()
);
// "when" part of the test
run(process).startByKey("ReadmeProcess").execute();
// "then" part of the test
verify(process).hasFinished("WorkFinished");
}
```
### Camunda Test Coverage
[camunda-bpm-process-test-coverage](https://github.com/camunda/camunda-bpm-process-test-coverage/) visualises test process pathes and checks your process model coverage ratio. Running typical JUnit tests leaves html files in the build output.
## Resolving Beans Without Spring/CDI
The `Mocks` class can be used to make beans available inside the *Expression Language* or in *Script Tasks* without the need of any bean manager.
Register the bean inside the application:
```java theme={null}
Mocks.register("myBean", new Bean());
```
Now the named bean is exposed and can be used within the process:
```xml theme={null}
```
In the case, that mocked beans must be resolvable during process deployment (e.g. bean expression in timer start event definition),
one should make sure, that they are registered before the deployment happens. E.g. when used in combination with
`@Deployment` annotation, beans should not be registered in `@Before` method, but rather the separate test rule can be created, that registers beans on startup,
and chained before `ProcessEngineRule`.
**The mocked beans feature should be used for testing purposes only.** Beans that are stored with `Mocks` are exclusively available within the respective storing thread as it is based on `ThreadLocal`. In most productive environments, it is not possible to access mocked beans during process execution due to the reason that jobs are executed by the multi-threaded Job Executor. Since the [Job Executor is disabled in unit test scenarios](/user-guide/process-engine/the-job-executor#job-executor-in-a-unit-test), the thread of process execution is the same that creates mocked bean instances.
## Best Practice
### Write Focused Tests
The feature to [start a process instance at a set of activities](/user-guide/process-engine/process-engine-concepts#start-a-process-instance-at-any-set-of-activities) can be used to to create a very specific scenario without much setup. Similarly, certain activities can be skipped by using [process instance modification](/user-guide/process-engine/process-instance-modification).
### Scoping Tests
BPMN processes, CMMN cases and DMN decisions do not exist in isolation. Consider the example of a BPMN process: firstly, the process itself is executed by the ASEE Flow engine which requires a database. Next, the process is "not just the process". It can contain expressions, scripts and often calls out to custom Java classes which may in turn again call out to services, either locally or remotely. To test the process, all these things need to be present, otherwise the test cannot work.
Setting all of this up just to run a unit test is expensive. This is why, in practice, it makes sense to apply a concept which we call test scoping. Scoping the test means limiting the amount of infrastructure required to run the test. Things outside of the scope of the test are mocked.
#### Example: Scoping Tests for a Java EE Application
This is best explained using an example. Assume you are building a typical Java EE application containing a BPMN process. The process uses Java Expression Language (EL) for conditions, it invokes Java Delegate implementations as CDI beans, these beans may in turn call out to the actual business logic implemented as EJBs. The business logic uses JPA for maintaining additional business objects in a secondary database. It also sends out messages using JMS to interact with external systems and has a nice web UI. The application runs inside a Java EE application server like Wildfly.
To test this application, all components, including the application server itself, need to be present and the external systems need to process the JMS messages. This makes it hard to write focused tests. However, by looking at the process itself, we find that there are many aspects of it that we can test without having the complete infrastructure in place. For example, if the process data is present, the Expression Language conditions can usually be tested without any additional infrastructure. This already allows asserting that the process "takes the right turn" at a gateway given a set of input data. Next, if the EJBs are mocked, the delegation logic can be included in such tests as well. This allows asserting that wiring of the delegation logic is correct, that it performs correct data transformation and mapping and that it invokes the business logic with the correct parameters. Given that the ASEE Flow engine can work with an in-memory database, it now becomes possible to test the BPMN process "in isolation", as a unit test and assert its local functional correctness. The same principle can be applied to the next "outer layers" of the system, including the business logic and external systems.
The following drawing shows a schematic representation of what this looks like for our example of a Java EE application:
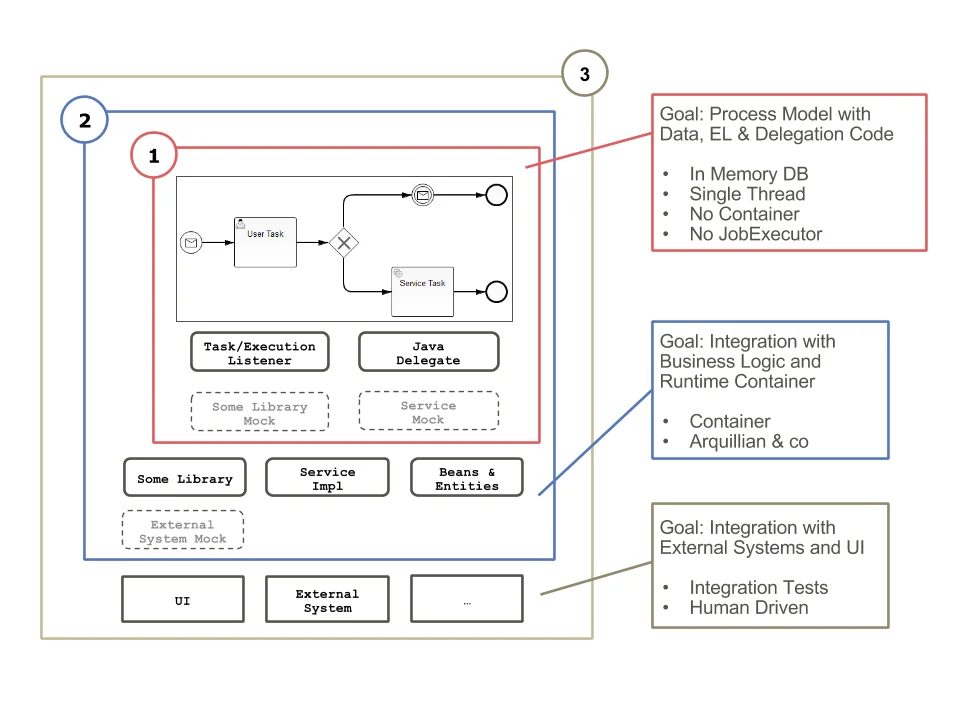 Three test scopes are defined:
* Scope 1: Local, functional correctness of the process model with data, conditions and delegation code, usually implemented as a unit test.
* Scope 2: Integration with business logic inside the runtime container, for Java EE applications usually implemented as an Arquillian-based integration test.
* Scope 3: Integration with external systems and UI.
Note that the above is just an example for a Java EE application, other applications may require different test scopes. However the principle remains the same.
Three test scopes are defined:
* Scope 1: Local, functional correctness of the process model with data, conditions and delegation code, usually implemented as a unit test.
* Scope 2: Integration with business logic inside the runtime container, for Java EE applications usually implemented as an Arquillian-based integration test.
* Scope 3: Integration with external systems and UI.
Note that the above is just an example for a Java EE application, other applications may require different test scopes. However the principle remains the same.