> ## Documentation Index
> Fetch the complete documentation index at: https://docs.aseeflow.org/llms.txt
> Use this file to discover all available pages before exploring further.
# WebAdmin Quick Start
This guide adds ASEE Flow, with the [WebAdmin](/webadmin) administrative UI, to a fresh Spring Boot application. In about ten minutes you'll have the ASEE Flow engine running with the WebAdmin UI at `/webadmin` and form-based login.
## Prerequisites
* JDK 17 or 21 (see [supported environments](/introduction/supported-environments))
* Maven 3.9+ (or the Maven wrapper, `mvnw`)
## 1. Create a new Spring Boot application
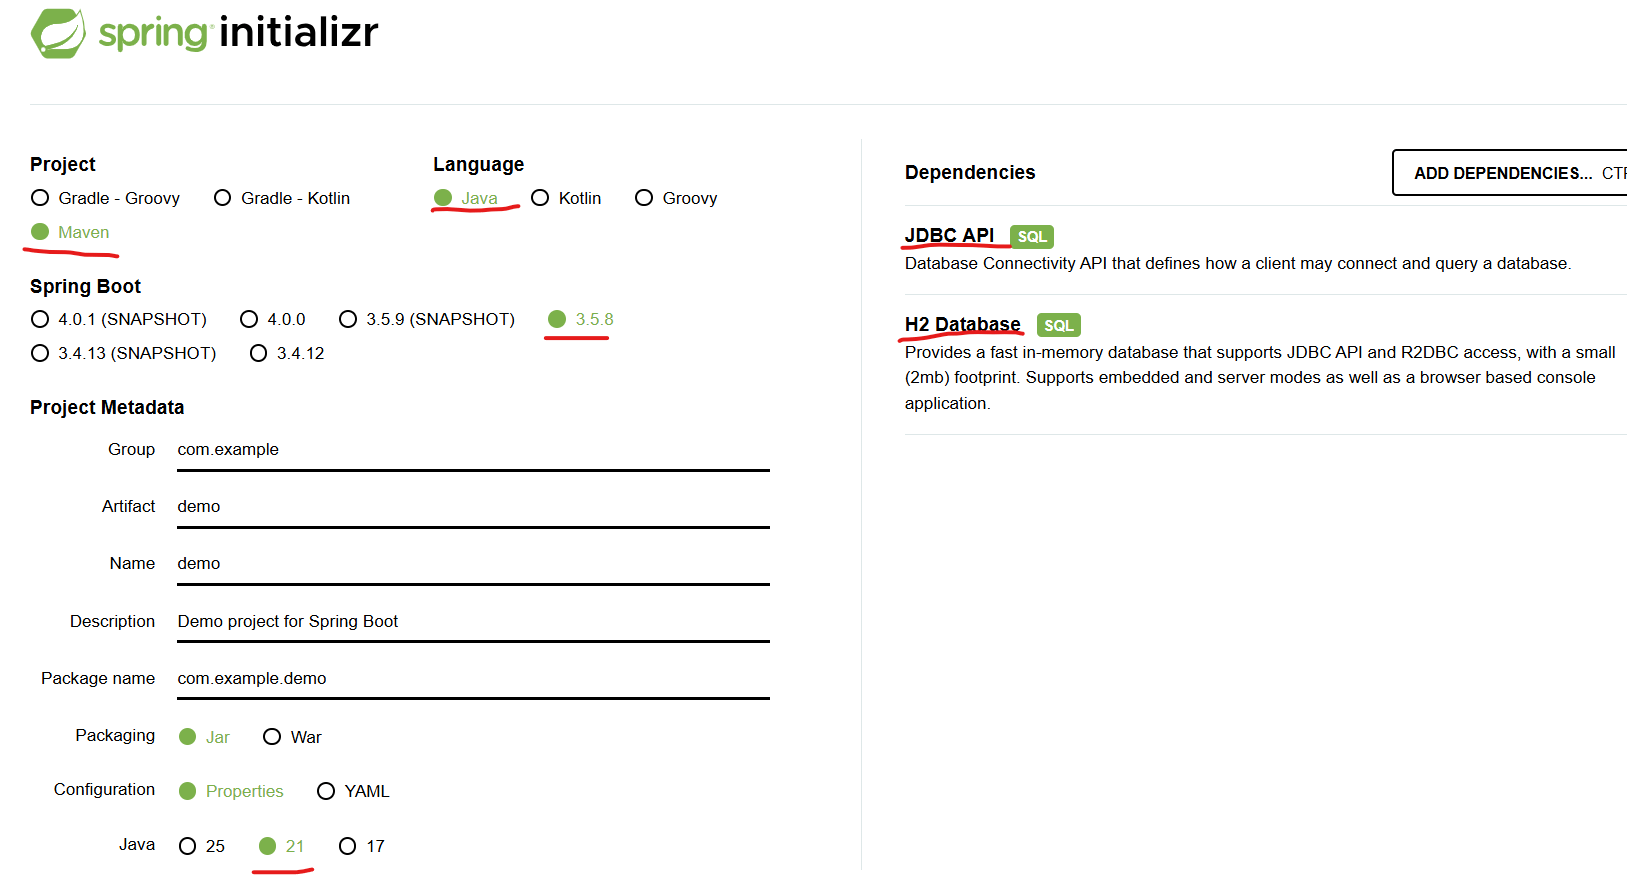
Generate a fresh project at [start.spring.io](https://start.spring.io/) with these settings:
* **Project:** Maven
* **Spring Boot:** the version start.spring.io offers — you switch it to 3.5.16 in step 2
* **Language / Java:** 17 or 21
* **Packaging:** Jar
For dependencies, select **JDBC** and **H2 Database**.
 ## 2. Download, extract, and open the project
1. Click **Generate** to download the project as a ZIP.
2. Extract it to a working folder.
3. Switch the project to Spring Boot 3.5. WebAdmin 1.0.2 runs on Spring Boot 3.5 and is built on 3.5.16; Spring Boot 4 is planned for ASEE Flow 2.0. start.spring.io offers only Spring Boot 4, so make three changes in `pom.xml`:
* Set the parent's `` to `3.5.16`.
* Remove the `spring-boot-h2console` dependency. In Spring Boot 3.5 the H2 console is part of Spring Boot itself.
* Replace `spring-boot-starter-jdbc-test` with `spring-boot-starter-test`.
4. Open the extracted folder — the one containing `pom.xml` — in your IDE (for example IntelliJ IDEA, Eclipse, or VS Code). Trust the project when prompted; the IDE imports Maven and downloads the dependencies.
## 3. Add the ASEE Flow repositories
**Customer access required.** ASEE Flow artifacts — Maven dependencies, Docker images, and pre-packaged distribution downloads — are hosted in a private repository available to ASEE Flow customers. To obtain the repository location and access credentials, [contact ASEE Software Solutions](https://contentservices.asee.io/asee-software-solutions/#contact-us). See [Accessing artifacts](/introduction/downloading-aseeflow#accessing-artifacts) for setup steps.
ASEE Flow WebAdmin and the BPM platform are published to the ASEE Flow customer repositories. Add both repositories to your `pom.xml`, using the URLs you received from ASEE, and put your credentials in matching `` entries in `~/.m2/settings.xml`:
```xml theme={null}
aseeflow
ASEE_MAVEN_REPOSITORY_URL
aseeflow-webadmin
ASEE_WEBADMIN_MAVEN_REPOSITORY_URL
```
Add matching `` entries (with the same `` values) and your credentials to `~/.m2/settings.xml`, then reload Maven after saving.
## 4. Add the dependencies
Define the versions in `` (use the latest available versions). Since 1.0.2, WebAdmin has the same version number as the platform:
```xml theme={null}
1.0.2
1.0.2
```
Add the engine webapp, WebAdmin starter, engine REST, and Spring Security to ``:
```xml theme={null}
org.aseeflow.bpm.springboot
aseeflow-bpm-spring-boot-starter-webapp
${aseeflow.bpm-platform.version}
org.aseeflow.webadmin
aseeflow-webadmin-spring-boot-starter
${aseeflow.webadmin.version}
org.aseeflow.bpm.springboot
aseeflow-bpm-spring-boot-starter-rest
${aseeflow.bpm-platform.version}
org.springframework.boot
spring-boot-starter-security
```
`spring-boot-starter-security` is declared as `provided` inside the WebAdmin starter, so you must include it explicitly. WebAdmin must never be left without a security layer.
What each dependency does:
* **`aseeflow-bpm-spring-boot-starter-webapp`** — the ASEE Flow engine and web apps.
* **`aseeflow-webadmin-spring-boot-starter`** — the WebAdmin React UI and backend, served at `/webadmin`.
* **`aseeflow-bpm-spring-boot-starter-rest`** — the engine REST API that WebAdmin consumes.
* **`spring-boot-starter-security`** — required for a production-ready security layer.
## 5. Configure the datasource and admin user
Create `src/main/resources/application.yaml`:
```yaml theme={null}
spring:
h2:
console:
enabled: true
datasource:
driver-class-name: org.h2.Driver
username: sa
password: sa
url: jdbc:h2:file:./aseeflow-h2-database;AUTO_SERVER=TRUE
camunda.bpm:
admin-user:
id: demo
password: demo
firstName: demo
lastName: demo
aseeflow:
webadmin:
authentication: form
```
This is example configuration for local development — an embedded H2 file database and a `demo` / `demo` admin user. **Do not use it in production:** use a production-grade database and create real users. See [Security](/webadmin/security).
Form-based login gives a branded login page and is easy to swap for SSO later. See [Authentication](/webadmin/authentication) for the other modes.
## 6. Run and verify
```bash theme={null}
mvn spring-boot:run
```
Then open:
* **WebAdmin UI** — `http://localhost:8080/webadmin` (log in with `demo` / `demo`)
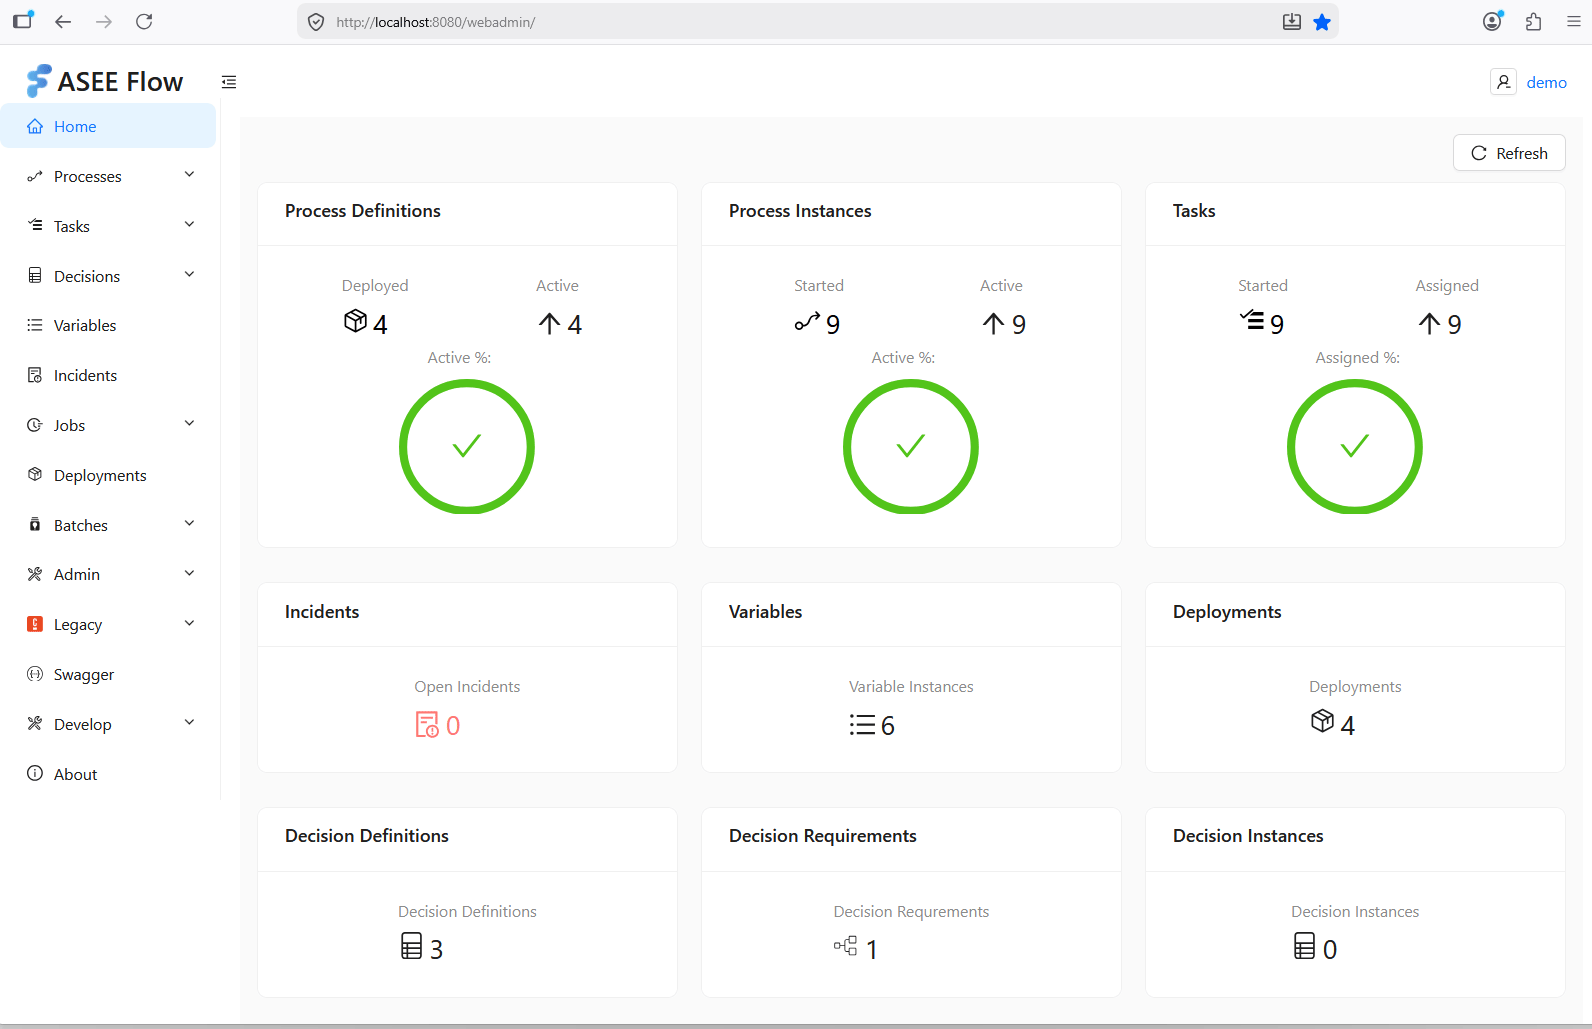
After logging in, the WebAdmin home shows an overview of your engine — process definitions, instances, tasks, decisions, and more:
## 2. Download, extract, and open the project
1. Click **Generate** to download the project as a ZIP.
2. Extract it to a working folder.
3. Switch the project to Spring Boot 3.5. WebAdmin 1.0.2 runs on Spring Boot 3.5 and is built on 3.5.16; Spring Boot 4 is planned for ASEE Flow 2.0. start.spring.io offers only Spring Boot 4, so make three changes in `pom.xml`:
* Set the parent's `` to `3.5.16`.
* Remove the `spring-boot-h2console` dependency. In Spring Boot 3.5 the H2 console is part of Spring Boot itself.
* Replace `spring-boot-starter-jdbc-test` with `spring-boot-starter-test`.
4. Open the extracted folder — the one containing `pom.xml` — in your IDE (for example IntelliJ IDEA, Eclipse, or VS Code). Trust the project when prompted; the IDE imports Maven and downloads the dependencies.
## 3. Add the ASEE Flow repositories
**Customer access required.** ASEE Flow artifacts — Maven dependencies, Docker images, and pre-packaged distribution downloads — are hosted in a private repository available to ASEE Flow customers. To obtain the repository location and access credentials, [contact ASEE Software Solutions](https://contentservices.asee.io/asee-software-solutions/#contact-us). See [Accessing artifacts](/introduction/downloading-aseeflow#accessing-artifacts) for setup steps.
ASEE Flow WebAdmin and the BPM platform are published to the ASEE Flow customer repositories. Add both repositories to your `pom.xml`, using the URLs you received from ASEE, and put your credentials in matching `` entries in `~/.m2/settings.xml`:
```xml theme={null}
aseeflow
ASEE_MAVEN_REPOSITORY_URL
aseeflow-webadmin
ASEE_WEBADMIN_MAVEN_REPOSITORY_URL
```
Add matching `` entries (with the same `` values) and your credentials to `~/.m2/settings.xml`, then reload Maven after saving.
## 4. Add the dependencies
Define the versions in `` (use the latest available versions). Since 1.0.2, WebAdmin has the same version number as the platform:
```xml theme={null}
1.0.2
1.0.2
```
Add the engine webapp, WebAdmin starter, engine REST, and Spring Security to ``:
```xml theme={null}
org.aseeflow.bpm.springboot
aseeflow-bpm-spring-boot-starter-webapp
${aseeflow.bpm-platform.version}
org.aseeflow.webadmin
aseeflow-webadmin-spring-boot-starter
${aseeflow.webadmin.version}
org.aseeflow.bpm.springboot
aseeflow-bpm-spring-boot-starter-rest
${aseeflow.bpm-platform.version}
org.springframework.boot
spring-boot-starter-security
```
`spring-boot-starter-security` is declared as `provided` inside the WebAdmin starter, so you must include it explicitly. WebAdmin must never be left without a security layer.
What each dependency does:
* **`aseeflow-bpm-spring-boot-starter-webapp`** — the ASEE Flow engine and web apps.
* **`aseeflow-webadmin-spring-boot-starter`** — the WebAdmin React UI and backend, served at `/webadmin`.
* **`aseeflow-bpm-spring-boot-starter-rest`** — the engine REST API that WebAdmin consumes.
* **`spring-boot-starter-security`** — required for a production-ready security layer.
## 5. Configure the datasource and admin user
Create `src/main/resources/application.yaml`:
```yaml theme={null}
spring:
h2:
console:
enabled: true
datasource:
driver-class-name: org.h2.Driver
username: sa
password: sa
url: jdbc:h2:file:./aseeflow-h2-database;AUTO_SERVER=TRUE
camunda.bpm:
admin-user:
id: demo
password: demo
firstName: demo
lastName: demo
aseeflow:
webadmin:
authentication: form
```
This is example configuration for local development — an embedded H2 file database and a `demo` / `demo` admin user. **Do not use it in production:** use a production-grade database and create real users. See [Security](/webadmin/security).
Form-based login gives a branded login page and is easy to swap for SSO later. See [Authentication](/webadmin/authentication) for the other modes.
## 6. Run and verify
```bash theme={null}
mvn spring-boot:run
```
Then open:
* **WebAdmin UI** — `http://localhost:8080/webadmin` (log in with `demo` / `demo`)
After logging in, the WebAdmin home shows an overview of your engine — process definitions, instances, tasks, decisions, and more:
 ### Engine REST
Check that the ASEE Flow REST API is up by inspecting the engine version at `http://localhost:8080/engine-rest/version`
— it returns the engine version as JSON.
In `form` mode the REST API is protected, so open it in the same browser after logging into WebAdmin (the session authorizes the request); an unauthenticated request returns `401`.
### Connecting the H2 console
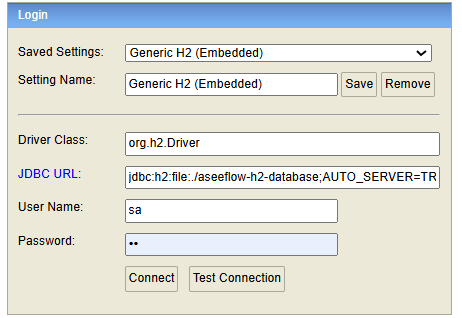
Open `http://localhost:8080/h2-console` and enter the same values as the application's datasource, then click **Connect**:
* **Driver Class** — `org.h2.Driver`
* **JDBC URL** — `jdbc:h2:file:./aseeflow-h2-database;AUTO_SERVER=TRUE`
* **User Name** — `sa`
* **Password** — `sa`
The JDBC URL must match the `spring.datasource.url` you set in step 5.
### Engine REST
Check that the ASEE Flow REST API is up by inspecting the engine version at `http://localhost:8080/engine-rest/version`
— it returns the engine version as JSON.
In `form` mode the REST API is protected, so open it in the same browser after logging into WebAdmin (the session authorizes the request); an unauthenticated request returns `401`.
### Connecting the H2 console
Open `http://localhost:8080/h2-console` and enter the same values as the application's datasource, then click **Connect**:
* **Driver Class** — `org.h2.Driver`
* **JDBC URL** — `jdbc:h2:file:./aseeflow-h2-database;AUTO_SERVER=TRUE`
* **User Name** — `sa`
* **Password** — `sa`
The JDBC URL must match the `spring.datasource.url` you set in step 5.
 ## Next steps
* **Build a process** — model and run a BPMN process or DMN decision in the [Get Started tutorials](/get-started).
* **Secure it** — pick an authentication mode and harden for production in [Authentication](/webadmin/authentication) and [Security](/webadmin/security).
* **Configure** — see the full [configuration reference](/webadmin/configuration).
This documentation is built and hosted on [Mintlify](https://mintlify.com), a developer documentation platform.
## Next steps
* **Build a process** — model and run a BPMN process or DMN decision in the [Get Started tutorials](/get-started).
* **Secure it** — pick an authentication mode and harden for production in [Authentication](/webadmin/authentication) and [Security](/webadmin/security).
* **Configure** — see the full [configuration reference](/webadmin/configuration).
This documentation is built and hosted on [Mintlify](https://mintlify.com), a developer documentation platform.